Wednesday, December 26, 2012
What I got for Christmas! Fashion video
Monday, December 17, 2012
8 gifts to get your boyfriend
1. Candy arrangement
If your boyfriend has a sweet tooth then this is the perfect gift. What you will need is a small bowl, a styrofoam ball that fits inside the bowl, glue, toothpicks, and an array of your boyfriend's favorite sweets. Glue the styrofoam ball into the bowl. Then, stick the candy onto the toothpicks and stick the other end of the toothpick into the styrofoam ball. Continue this step until the styrofoam is completely covered.
2. Jar of hearts
If your boyfriend is the sentimental type, give him this romantic gift. Take a jar and fill the bottom with confetti, glitter, or any type of filler. Then, buy or make a bunch of tiny envelopes. Fill each envelope with a love note and then put all of the notes into the jar. When you give it to your boyfriend tell him to open one each morning. He'll start each day with a reminder of your love.
3. Books
If your boyfriend's a bookworm get him something to read. Buy him a book from his favorite author or a book you know he'll love. Don't know what kind of books he likes? Get him a bookstore gift card. It may sound kind of insensitive, but he'll be sure to love it. If you want to give him a more personal gift, make him a book mark. This way, every time he's reading he'll think of you. For the really daring, write him something. A poem, a love letter, maybe even a story.
4. The gamer
So your boyfriend's a gamer, try some of these gift ideas. Get him that video game he's been dying for. If he already has just about every game in existence, try a gift card to a video game store. You can also, get him a controller, you can never have too many of those.
5. Movie junky
If your boyfriend loves watching movies, get him movie tickets. You can get these at most movie theatres. Add a bag of popcorn, some candy, and stick it all in a popcorn container for a cute gift. You can also get him a movie theatre gift card. If you want to make it a little more personal, make him a movie.
6. Sports fanatic
If your boyfriend's a sports fan get him sports equipment. He doesn't play a sport? Get him tickets to a game. If you want to get more creative get a plain sweatshirt and decorate it with his number or the number of his favorite player.
7. Class clown
Does you boyfriend like to goof off or make jokes? Get him a joke book. Or try giving him a gag gift. You can also, get him a t shirt with a silly saying on it. If you want to be more creative, write him a joke book or decorate a t shirt with a funny saying.
8. The artist
If your boyfriend loves art, get him art supplies. If you're also an artist, draw him a picture or a poster.
As you can see I kind of ran out of ideas at the end, each one getting shorter and shorter.... Feel free to comment if you have any ideas you would like to add or if you are looking for ideas for a type of boy who isn't listed here. Also, feel free to comment on any of my other posts, telling me what you think, what kinds of posts you want to see more of, and any ideas you have for future posts. Hope this post helped make your holiday season a little less stressful :)
Stay Beautiful! ;D
Saturday, December 15, 2012
DIY: Glam Globes
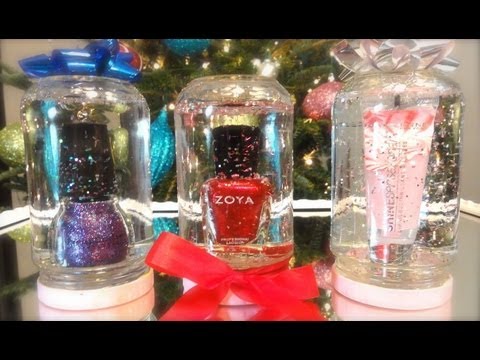
You will need an empty jar with a screw top lid, a cosmetic product with a secure lid, gems or stones, glitter, hot glue gun with glue sticks, cotton rounds, and rubbing alcohol. The jar should be large enough for your cosmetic product to fit inside. Also, if you wish to paint your jar lid you will need paint and a paintbrush. Start out by cleaning your jar and removing an labels. If the bales leave any residue you can use the rubbing alcohol to clean it off. Just pour some of it onto a cotton round and rub off the residue. If you want to paint your lid then start out by painting a light coat on the top of the lid. Once you have painted the to, let it dry before painting the sides. Let the lid dry completely before moving on to the next step. If there is a sticker at the bottom of the cosmetic product be sure to remove it. Glue stones or gems to to the center of the lid, making sure you don't go to close to the edges. Then, glue the cosmetic poroduct to the stones. Fill the jar with water and add glitter. Then, screw the lid onto the jar. Make sure that the lid is secure so that no water leakes out. And you're done! After you give this gift to someone, if they want to use the product they can just unscrew the lid and pull off the product. The glue will stick to the stones and not the product so that it can be removed.
Glam Globe tutorial
Stay Beautiful! ;D
Saturday, November 24, 2012
DIY: ear cuff

You will need 18 gauge wire, chains, head pins, round pliers or cutters, and beads, pendants, or gems. First, cut a 20 cm piece of the 18 gauge metal wire. Use the round nose pliers to make a loop at one end of the wire. Cut the chain into 6 pieces each 6 cm long. Take one of the chains and string it onto the loop, then use the pliers to close the loop. Use your hands to shape the wire to the shape of your ear. Slide a chain onto the wire and keep it in place with a loop. Continue adding chains to the wire and securing them with loops. Take a pendant/bead/gem and thread it onto a head pin. Thread the pin through the last link in the first chain and create a loop. Cut off the excess. Repeat this for all of the chains and you're done.
Ear cuff tutorial
Stay Beautiful! ;D
Sunday, November 11, 2012
DIY: Beaded Cuff

You will need a cuff, an assortment of beads (sead beads, etc.) , leather, leather cement, embellishing glue, pendants or stones, pencil, and illusion cord. Start by rolling the cuff over the leather to get an imprint. then use a pencil to trace the outline of the imprint. Cut out the shape. Use the leather cement to glue the leather to the cuff. Glue on the stones or pendants with the embellishment glue. Tie abead to the end of the illusion cord and then start stringing on sead beads. Once you have a string of beads long enough to go around your cuff, secure the other end by tying a bead, then glue it around the edge of the cuff. Cut off any excess string. Make more bead strands and glue them around your stones/pendants. Continue this step until there is no space between the bead strands and the edge of the bracelet. Glue multiple strands around the edge of the cuff until you are satisfied with the look. Fill in the rest of the cuff with beads in any pattern you like. Let it dry and you're done.
Beaded Cuff Tutorial
Stay Beautiful! ;D
Sunday, November 4, 2012
DIY: Cap toe shoes

You will need a pair of shoes, metallic spray paint, finishing gloss spray, and painter's tape. Take the painter's tape and cover the entire shoe except for the toe. Then, take the spray paint and spray the exposed part of the shoe, holding your spray paint at least 6 inches away. Let the paint dry for 5 to 10 minutes. Then, spray on a layer of finishing gloss spray. Let your shoes dry over night and your done!
Cap toe shoe tutorial
Stay Beautiful! ;D
Saturday, November 3, 2012
DIY: Fishbone bracelet

You will need chain, one meter of suede cord, beads, and pliers. Wrap the chain around your wrist so that there is a one inch gap between the end and the rest of the chain. use the pliers to break the chain link connecting the section you measured and the rest of the chain. Use the pliers to remove the link. Separate two more pieces of chain, they should be two links shorter than the first piece. Take the suede cord and pull it through the second link in the longest chain so that the same amount of suede cord is on each side of the chain. Then, string a short chain onto each side of the suede cord through the first link. take the suede cord from one of the sides and thread it through the first open link in the longest chain. Then, do the same on the other side, but put the cord in the same link as the first cord. Both cords should be in the same link. Then, thread the cord back into the short chains. Keep repeating these steps until you get to the bottom of the bracelet. Then, take one of the cords and thread it through the loop at the top of the bracelet. Take a bead and thread it on to the cord, then tie a knot at the end to secure it. Do the same to the other cord and your done.
Fishbone bracelet tutorial
Stay Beautiful! ;D
DIY: Peter Pan Collar

You will need a sheet of felt, scissors, ribbon, tacky glue, a pattern (linked at the bottom of the post) and whatever you want to decorate your necklace with. (ex. glitter, beads, studs, lace, brads, etc) So start off by printing out your pattern. Then, fold your felt in half and trace the pattern onto the felt so that the large end of the pattern is at the folded side. Then cut out your collar. Use the tacky glue to add any decorations you want to be on your necklace and give it a couple of hours to dry. Then flip it over to the back side and glue a piece of ribbon to both ends of the collar. The ribbon should be long enough for the necklace to fit around your neck. let the ribbon dry and then your done!
Peter Pan collar tutorial
Peter Pan Collar pattern
Stay Beautiful! ;D
Monday, October 15, 2012
DIY: Cobra braid bracelet

You will need, a chain, craft lace (gimp), scissors, pliers, tape, and glue. Wrap the craft lace around your wrist so that it is slightly longer than the circumference of your wrist. Cut the craft lace. Then, using your piece of craft lace measure out another piece that is 8 times the size of the first one. Fold the first piece in half and tape it down on both ends (the folded end and the open end). take the other piece of craft lace and fold that in half as well. take the middle and put it behind the piece that is taped down. Slide it up as close to the folded end as possible. Then, fold one side of the string over top of the taped down string, forming a loop or a "P". Take the string on the other side and pull it over the string making the loop, underneath the taped down string, and through the loop. Repeat this on the other side. Continue this step, alternating in sides. Once you get to about an inch left in the taped down lace, remove the tape. Take the open end and fold it back, creating a loop. Continue knotting, going over all four strands of lace. Tie a knot at the end of the lace and cut off any excess.Take the chain and measure it out so that it is half the length of your wrist. Use the scissors to break the links to separate the piece you want from the rest of your chain. Use the pliers to connect the chin to the loops on either end of the braided lace.
Cobra braid bracelet
Stay Beautiful! ;D
Sunday, October 7, 2012
DIY: Heart sweater

Stay Beautiful! ;D
Monday, September 24, 2012
DIY: Boho boots

Heyy guys! So first off I want to apologize that I haven't been updating my blog recently, but with school starting and everything I just haven't had the time. So today I have a DIY that I found on youtube by Mr. Kate and it is a "boho" boot tutorial. So what you will need is a pair of cowboy boots with a leather interior that you are okay with cutting, E6000 glue, glue gun with fabric glue sticks, masking tape, belts, lace, and any other material you want to use to adorn your boots. Start off by cutting down the back of one of the boot all the way down to the heel cap. Then bend the top down over the bottom. Take your belts and start wrapping them around your boot. Add other materials as desired. Once you get the look that you want start gluing them into place. Glue fabrics, ribbons, and lace with the fabric glue using the glue gun and the belt with the E6000 glue. Wear protection when using E6000 glue because it can damage you brain cells. Use masking tape to hold things in place while they dry.
Stay Beautiful! ;D
Mr. Kate Boho Boot tutorial
Sunday, September 9, 2012
August Favorites
Since August ended about a week ago I thought I would share my favorite products from the month of August. The first product is the Boscia BB cream. BB creams cover up blemishes along with containing acne fighting ingredients. They even have sunscreen in them. I don't like to wear a lot of make up so I usually just wear some BB cream to cover up my acne and even out my skin tone. The next product is the Boscia blotting papers. These absorb excess oils on your face. This is good to prevent acne and to get rid of any shininess. I like the EOS lip balm because it moisturizes my lips without making them sticky, and because it's not glossy it doesn't rub off. I like Essie nail polish in clambake because it gives me a bright pop of color. The orangy red hue is great for summer and can even work for fall and around the holidays. The urban decay primer potion is great to make eye shadows last and keep them from smudging. I like the urban decay naked eyeshadow palette because it has a variety of neutral colors that i can wear anytime. I like the color club nail polish in Blue-ming because i love its bright mint color. The Neutrogena daily facial sunblock is a great sunscreen that can be worn under make up or a facial moisturizer. Its very light but gives great protection with SPF 50. One thing that I don't like about it is that it leaves a whitish tint to my skin. Lastly, the Vanilla Dee-lite lotion from Lush is a thick, creamy, moisturizing lotion with a delicious vanilla scent.
Stay Beautiful! ;D
Stay Beautiful! ;D
 |
| Boscia BB cream |
 |
| Boscia blotting paper |
 |
| EOS lipbalm |
 |
| Essie nail polish in clambake |
 |
| Urban Decay primer potion |
 |
| Urban Decay Naked eyeshadow palette |
 |
| Color Club nail polish in Blue-ming |
 |
| Neutrogena daily facial sunblock |
 |
| Lush Vanilla Dee-lite lotion |
Monday, August 27, 2012
Scarf Haul!
 |
| $34.99, Madewell |
 |
| $20, Nordstrom |
 |
| $18, Nordstrom |
 |
| $18, Nordstrom |
 |
| $18, Nordstrom |
 |
| $18, Nordstrom |
 |
| $24.99, Madewell |
Thursday, August 23, 2012
DIY: Chain headband

Stay Beautiful! ;D
Wednesday, August 22, 2012
DIY: Hex Nut Bracelet

Stay Beautiful! ;D
Thursday, August 16, 2012
2 Fantastic style websites!


http://baublebar.com/index.php/rewardsref/index/refer/id/130488/
http://www.DailyLook.com/?refMemberID=-365200530565626672
Stay Beautiful! ;D
Wednesday, August 15, 2012
DIY: Shirt scarf #2

P.S. I made this.....
Stay Beautiful! ;D
DIY: shirt scarf #1

Don't know what to do with old shirts? Turn them into scarfs! One way to make a trendy scarf is to take an old shirt and cut it horizontally into 1 inch thick bands. Continue until you get to the armpit. Gently tug on each band to stretch them and they will curl in on themselves. Gather them in a pile and use one of them to tie the rest of them together by wrapping it through the pile. And that's it! You can even twist the strands for a whole new look!
Stay Beautiful! ;D

12 creative ways to knot a belt

12 ways to knot a belt
Stay Beautiful! ;D
Wednesday, August 8, 2012
DIY: braided chain bracelet

Henry Happened
Stay Beautiful! ;D
Thursday, August 2, 2012
Fish Net Nails

Stay Beautiful! ;D
DIY: cheetah print shorts

Stay Beautiful! ;D
How to get rid of black heads with lemon juice

Stay Beautiful! ;D
Wednesday, August 1, 2012
Temporarily dye your hair
I have been experimenting with ways to temporarily dye my hair. There is surprisingly a number of different ways to do it and I am trying to find the most affective one. One way is to rub your hair with eyeshadow. I tried this method, but did not get the results i wanted; it just made my hair dusty. I think that it would be more affective if I had a large container of loose powder eyeshadow. Another method that I tried was hair mascaras, but it blended into my dark hair and made a mess all over the bathroom. The only things it dyed were my hands. A method I have not tried yet is using Hair chalk or hairshadow. This is pigment specifically designed to temporarily dye your hair, but it can be expensive. Another way is to use regular chalk. The last method I have heard of is to use Kool-aid. I will continue my trials and get back to you with the results.
Stay Beautiful! ;D
Stay Beautiful! ;D
Cute Crochet Jeans

crochet motif jeans
Stay Beautiful! ;D
Newspaper Nails

Newspaper nail art by cutepolish
Stay Beautiful! ;D
How to wear it: sweater tube scarf
 I am starting a segment where I take an average piece of clothing and show you all the different cool ways that you can wear it. The first article of clothing I will be using is a tube scarf made of sweater material. Besides wearing it as a scarf, there are many other cute and fun ways to wear it. One way is to layer it over a shirt and wear it as a tube top. The one I have has a piece of yarn running across the top, which i can use to adjust the fit, but if yours doesn't you can use a safety pin to pin it in the back. Another way to wear is as a hat. I tied one end closed with a hair tie and then used the yarn on the other side to tie it around my head. This works great if you want the slouchy beanie look. The last way you can wear it is as a leg warmer. I tucked one end of the scarf into a boot and tied the other end around my leg. Then, I scrunched it down around the opening of the boot. I hope this inspires you to think outside the box and find new ways to wear your clothes.
Stay Beautiful! ;D
Fiercely fabulous stripes

GL article
Stay Beautiful! ;D
Classic French Mani with a twist
Stay Beautiful! ;D
Monday, July 30, 2012
How to prolong the life of summer staples
Summer is nearing its end and BTS shopping has officially started. Don't want to pack up your summer favorites? Here are a few ways to use your summer clothes all the way into fall. Your sun dress was great as a cover up at the pool, comfy lounging around the house, and even dressy for a casual out-to-dinner outfit but now that school is starting your worried you'll have to condemn it to the back of your closet for the season. With a cute sweater shrug, leggings, and boots you can make it last till Christmas break! Save your summer shorts with a pair of tights and cute booties and your summer tanks with layering and scarfs.
Stay Beautiful! ;D
Stay Beautiful! ;D
Monday, July 9, 2012
How to get soft lips

Stay Beautiful! ;D
brighten your nails with toothpaste

stay beautiful! ;D
Saturday, February 25, 2012
Reasons to be happy
Ever feel down in the dumps? Try making a list of reasons for you to be happy. Here's mine:
1. Running barefoot in the summer
2. Raw cookie dough
3. Dancing around like an idiot when no one is watching
4. Having a moment alone underwater
5. Running in the pouring rain
6. Jumping on your bed to the beat of your favorite dance song
7. Chick flicks
8. Slumber parties like they are in movies
9. Screaming at the top of your lungs when you feel like exploding inside
10. When someone tells you something really sappy
11. When people make you feel beautiful
12. When a good song comes on the radio
13. When you’re wearing someone else’s clothes (only when its someone you care about) and it still smells like them
14. Riding your bike through a seashore town
15. Searching for seashells
16. The smell of rain
17. The smell of autumn
18. Looking forward to that first kiss
Subscribe to:
Posts (Atom)